
Table Saw Tenoning Jig
Hold a workpiece upright and guide it past a table-saw blade to cut repeatable tenon cheeks.
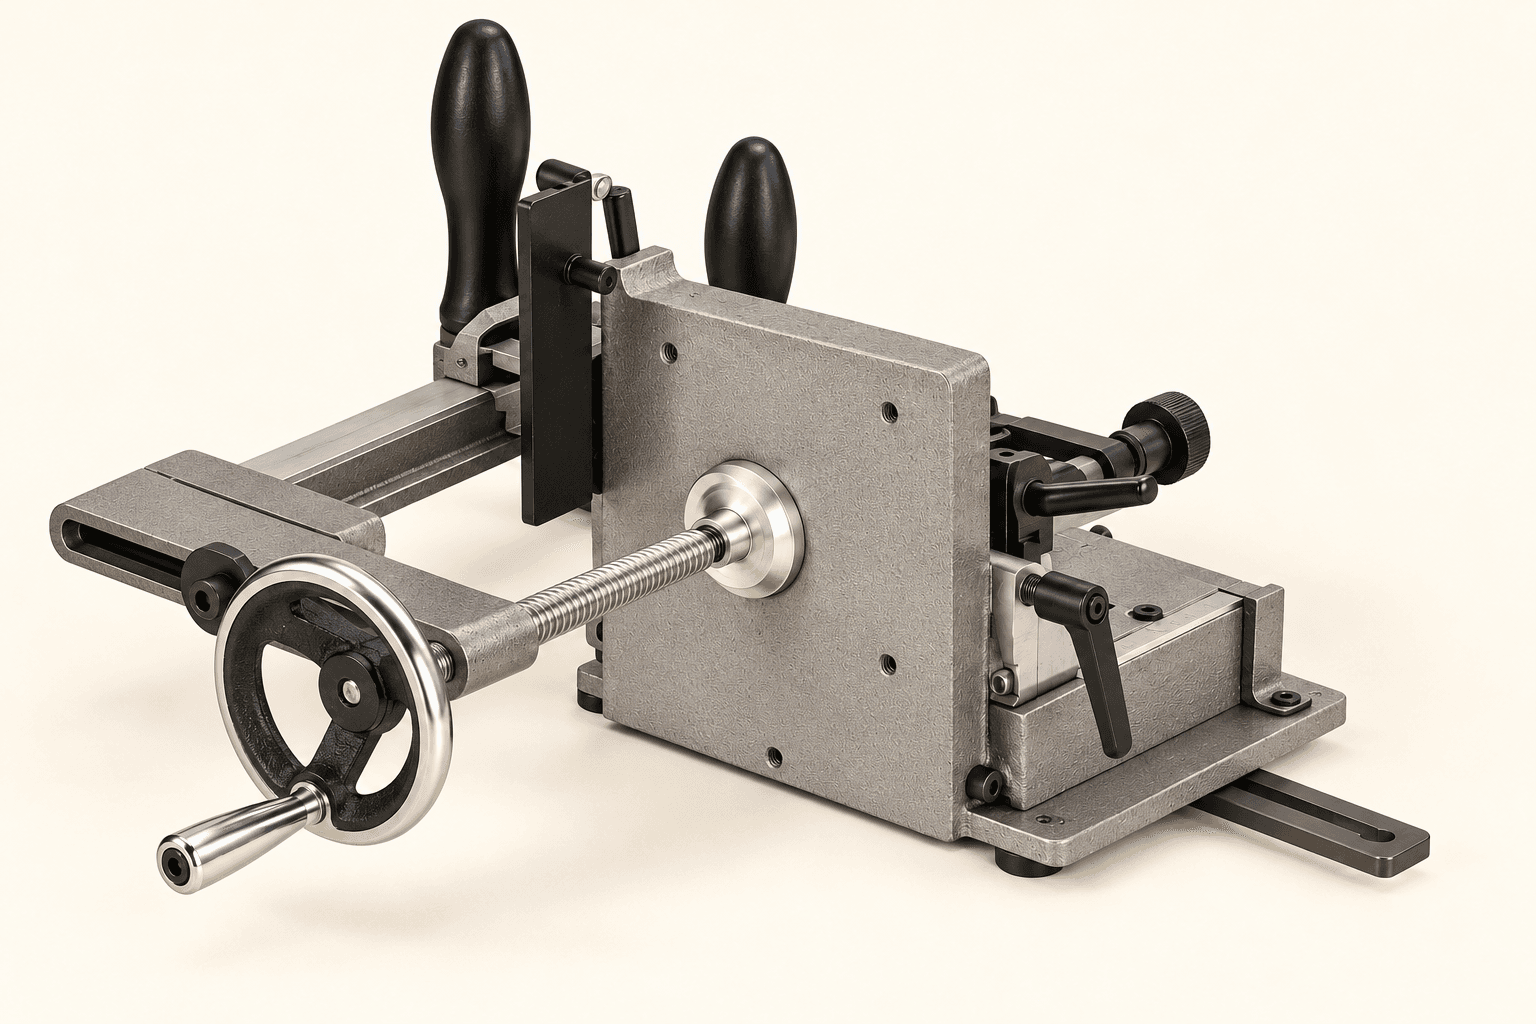
See the assembled tool and its components
An original educational poster identifies 9 documented construction features. The numbered descriptions remain readable below the artwork on narrow screens.
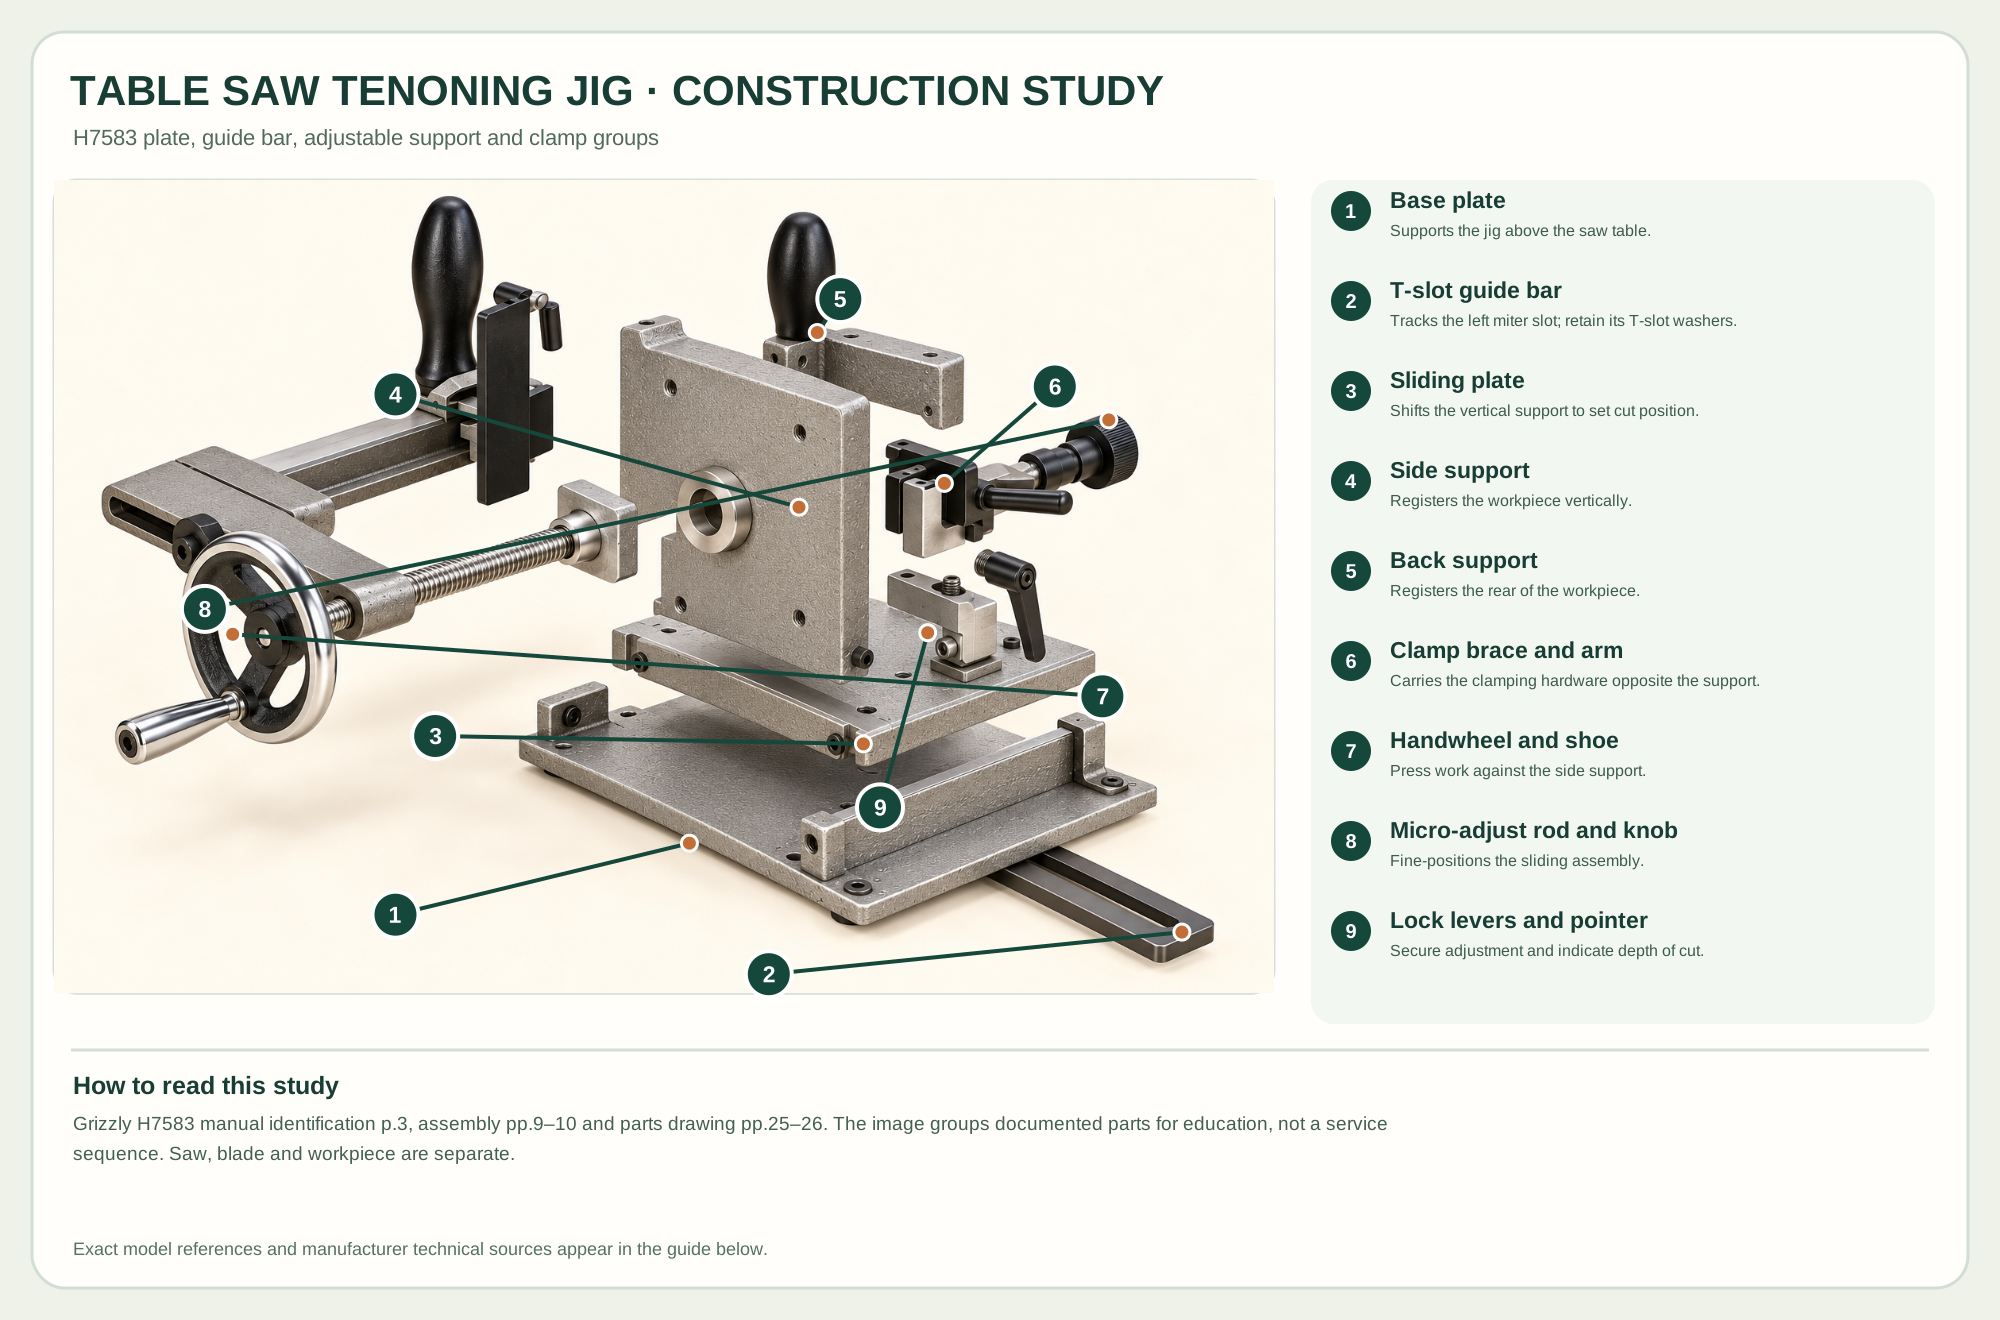
- Base plate
Supports the jig above the saw table.
- T-slot guide bar
Tracks the left miter slot; retain its T-slot washers.
- Sliding plate
Shifts the vertical support to set cut position.
- Side support
Registers the workpiece vertically.
- Back support
Registers the rear of the workpiece.
- Clamp brace and arm
Carries the clamping hardware opposite the support.
- Handwheel and shoe
Press work against the side support.
- Micro-adjust rod and knob
Fine-positions the sliding assembly.
- Lock levers and pointer
Secure adjustment and indicate depth of cut.
Technical references: Grizzly H7583 product · Grizzly H7583 official manual. The T-slot guide bar rides in the saw's left miter slot beneath the base. A slide plate shifts the tall side support toward the blade. A back support squares the work while the handwheel moves a clamp shoe from the opposite side. The micro-adjust rod and locks position the support before cutting. Original educational artwork depicts documented component groups and their relationships; it is not a service sequence or a replacement for the exact model manual.
What it is and what each part does
The Grizzly H7583 is a heavy table-saw accessory, not a saw or a freestanding cutter. Its guide bar is intended for a 3/8-by-3/4-inch T-slot to the left of the blade. The cast base and sliding plate carry an upright side support, adjustable back support and handwheel clamp. The single lower guide bar and its T-slot washers must remain secure. This original unbranded study follows the H7583 identification and parts pages; do not assume that another saw's slot, blade clearance or guard arrangement will fit.
A secured workpiece is held against the upright support and backstop. The jig's guide bar tracks the saw's left miter slot as the whole jig advances past the blade. The sliding plate and micro-adjust shift the work relative to the cutter; lock levers secure the settings. The handwheel advances one clamp shoe toward the work. The saw's own blade makes the cut. The separated view groups documented H7583 parts and keeps the saw outside the illustration.
Base and T-slot guide bar
The bar runs lengthwise beneath the base. Grizzly expressly warns against removing the washers at its ends; they help retain the jig in a T-slot.
Sliding plate and micro-adjust
The plate shifts the vertical work support across the base; a threaded rod, knob and lock set the cut offset. The scale and pointer are setup aids.
Side and back support
The tall side support holds stock vertical. The shorter back support registers its end and can be adjusted for the intended angle.
Clamp brace, handwheel and shoe
The brace carries a threaded shaft and large handwheel. The shoe presses the work against the side support; the work must be secure before a cut.
How the main groups connect
One miter bar guides the clamped work
Set, guide and control the action
These decisions make the mechanism useful at the bench.
Fit the saw
Disconnect power. Check the left T-slot size, guide-bar fit and travel; inspect the T-slot washers and confirm the jig clears the blade and saw controls.
Square and set
Square the saw blade to the table and its miter slot, then set the side support and back support as the H7583 manual directs.
Clamp and test
Place stock against both supports, tighten the shoe, lock the slide and make a guarded scrap trial for both cheek locations.
Tenon cheeks
Use paired passes at controlled offsets to establish cheeks, leaving final thickness to be checked against the mating mortise.
Shouldered joint preparation
Cut cheeks with the jig and use a separately planned saw setup for shoulders; the jig itself does not make a complete tenon.
Angled work
Documented side and back support adjustments permit some bevel or angled work after scrap checks and clearance verification.
Setup, technique and finish quality
Use the steps for a first pass, then inspect the work before changing the setup.
- Read both the H7583 and table-saw manuals; disconnect saw power for setup.
- Inspect the 3/8-by-3/4-inch left T-slot, bar play and retained T-slot washers; adjust the bar's set screws only as instructed.
- Square the saw blade to the table and miter slot, and clean the table and slot.
- Set the side support perpendicular or at the documented angle, set the back support, and lock both.
- Set the sliding plate and micro-adjust to the desired blade offset; lock the plate and verify blade clearance through full travel.
- Clamp the work firmly against the support and backstop; rehearse the travel with power off.
- Use appropriate blade guarding and the manual's riving-knife instructions; make a scrap pass, inspect the cheek and adjust with power off before cutting workpieces.
The guide bar is a safety-critical fit
A loose bar allows lateral drift. The H7583 manual calls for snug free sliding fit and expressly forbids removing the T-slot washers.
One jig does not guarantee fit
Actual tenon thickness depends on blade kerf, saw alignment, both pass offsets and work clamping. Cut and measure a trial joint.
Clamp force is not a hold-down substitute
The handwheel presses stock toward the side support; the work must also register at the back support without rocking.
What changes by model or material
Use the square side support and a vertical saw blade for the baseline setup.
Use only the H7583's documented tilt and back support ranges after verifying that the blade and work clear the jig.
A different miter slot or left-of-blade geometry may make this jig incompatible; never discard the bar's retaining washers to force fit.
Choosing the tool
- Confirm a 3/8-by-3/4-inch T-slot left of the blade and full travel/clearance on your exact saw.
- Check maximum work height and depth against the H7583 manual rather than a generic tenoning-jig listing.
- Allow for jig mass, table support, a sound blade and trial cuts.
Useful accessories
- Compatible table saw and sharp suitable blade
- Square and measuring tools
- Sacrificial scrap stock
- Manufacturer-supplied T-slot washers and guide-bar hardware
Consumables
- Scrap stock for fit tests
- Replacement H7583-specific screws or pads if worn
Care, troubleshooting and safety
Stop the tool and disconnect power before investigating a fault or changing a part.
Care checklist
- Clean the miter bar and base sliding surfaces before use.
- Check all T-slot washers, cap screws, clamp shoe and lock levers.
- Keep the scale and pointer legible; store the heavy jig where it cannot fall.
- Use the maker's service instructions for any binding adjustment.
Common mistakes
- Removing the T-slot washers.
- Using the jig in a loose or wrong-side miter slot.
- Cutting before the clamp, back support and slide are locked.
- Assuming the jig also cuts shoulders without another saw setup.
Safety at the operation
- Disconnect the saw before jig setup, measurement, adjustment or clearing waste.
- Follow the saw and H7583 manuals for blade guard, riving knife, push path and body position.
- Keep hands on designated jig handles, clear of the blade and clamping path.
- Stop if the work shifts, the jig tips, the guide binds or the blade contacts metal.
When the result goes wrong
Inspect work clamping, bar fit, slide lock, saw alignment and blade runout; test both passes in scrap.
Power off; clean burrs and debris, then adjust the bar set screws per H7583 instructions while retaining T-slot washers.
Re-square side support, adjust the back support, inspect the clamp shoe and re-clamp flat stock.
Manuals and educational resources
Use the exact tool manual for setup, limits and replacement parts. These lessons, documents and model pages teach relevant techniques or help compare real variations.
Manufacturer manuals
Learn and compare
Manufacturers & Brands
These maker-owned links document relevant tools and tool brands. A product brand may use another company's factory; compare the exact model before choosing parts or accessories.
Choose parts for the exact model
Cutters, abrasives, guards, guides, dust fittings and service parts vary by tool. Check the model plate and manufacturer manual before ordering or changing a component.
Compare the Joinery family →Continue through the Tools library