
Woodworking Bow Saw
Cut tight curves with a narrow blade held in tension by a light wooden frame.
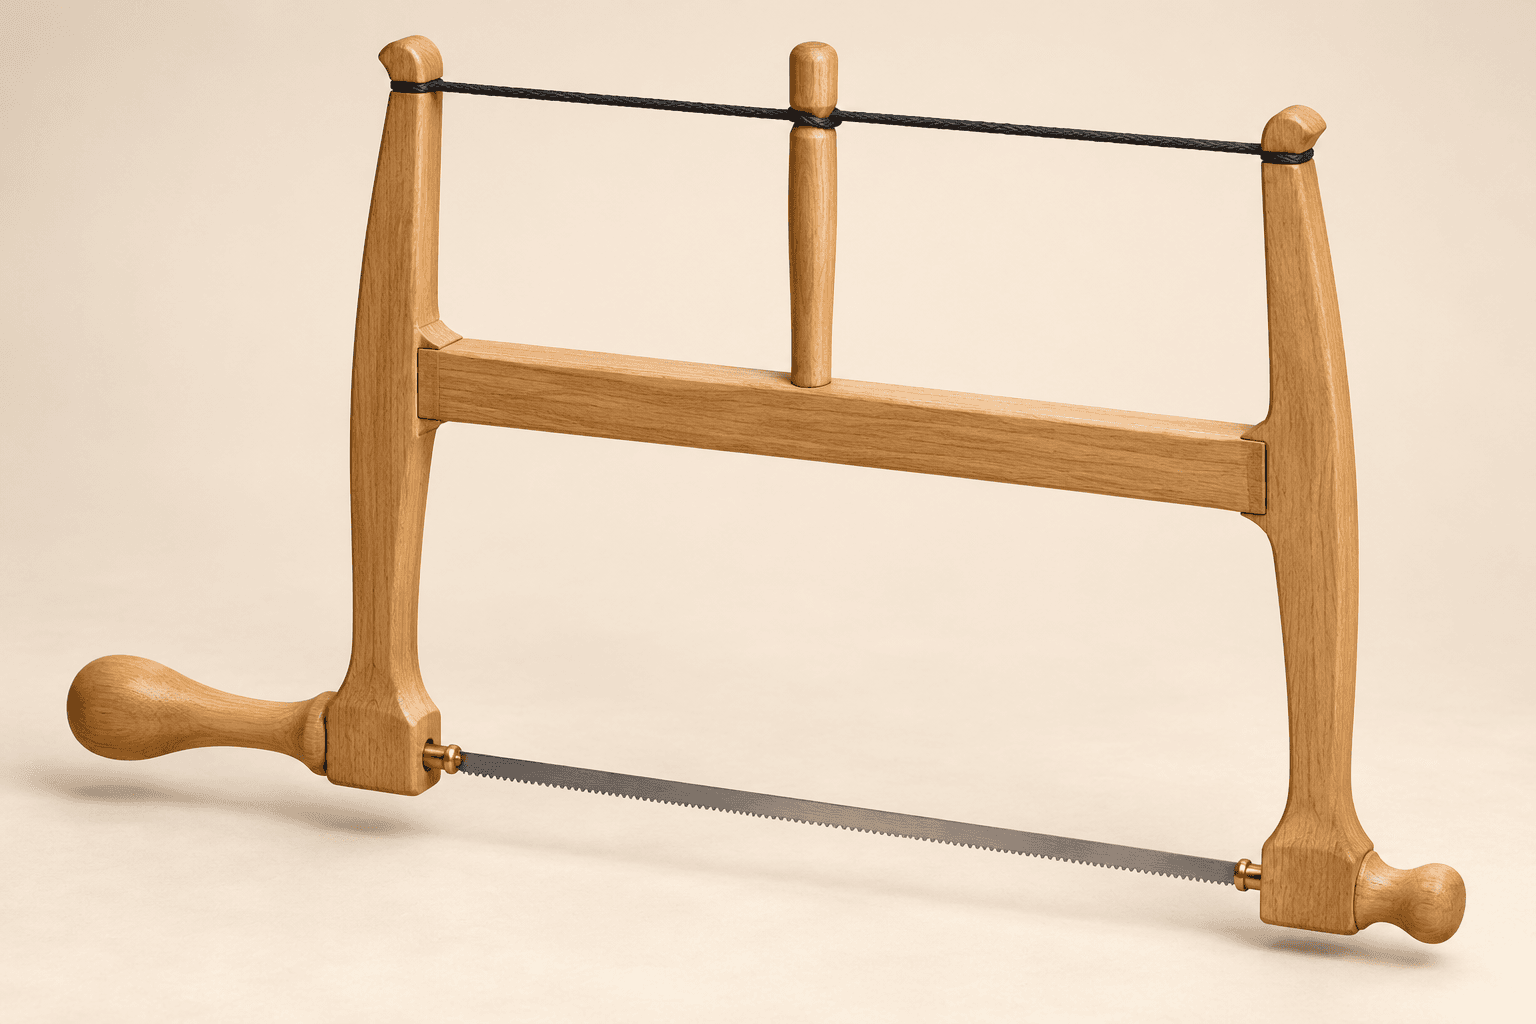
See the assembled tool and its components
An original educational poster identifies 8 documented construction features. The numbered descriptions remain readable below the artwork on narrow screens.
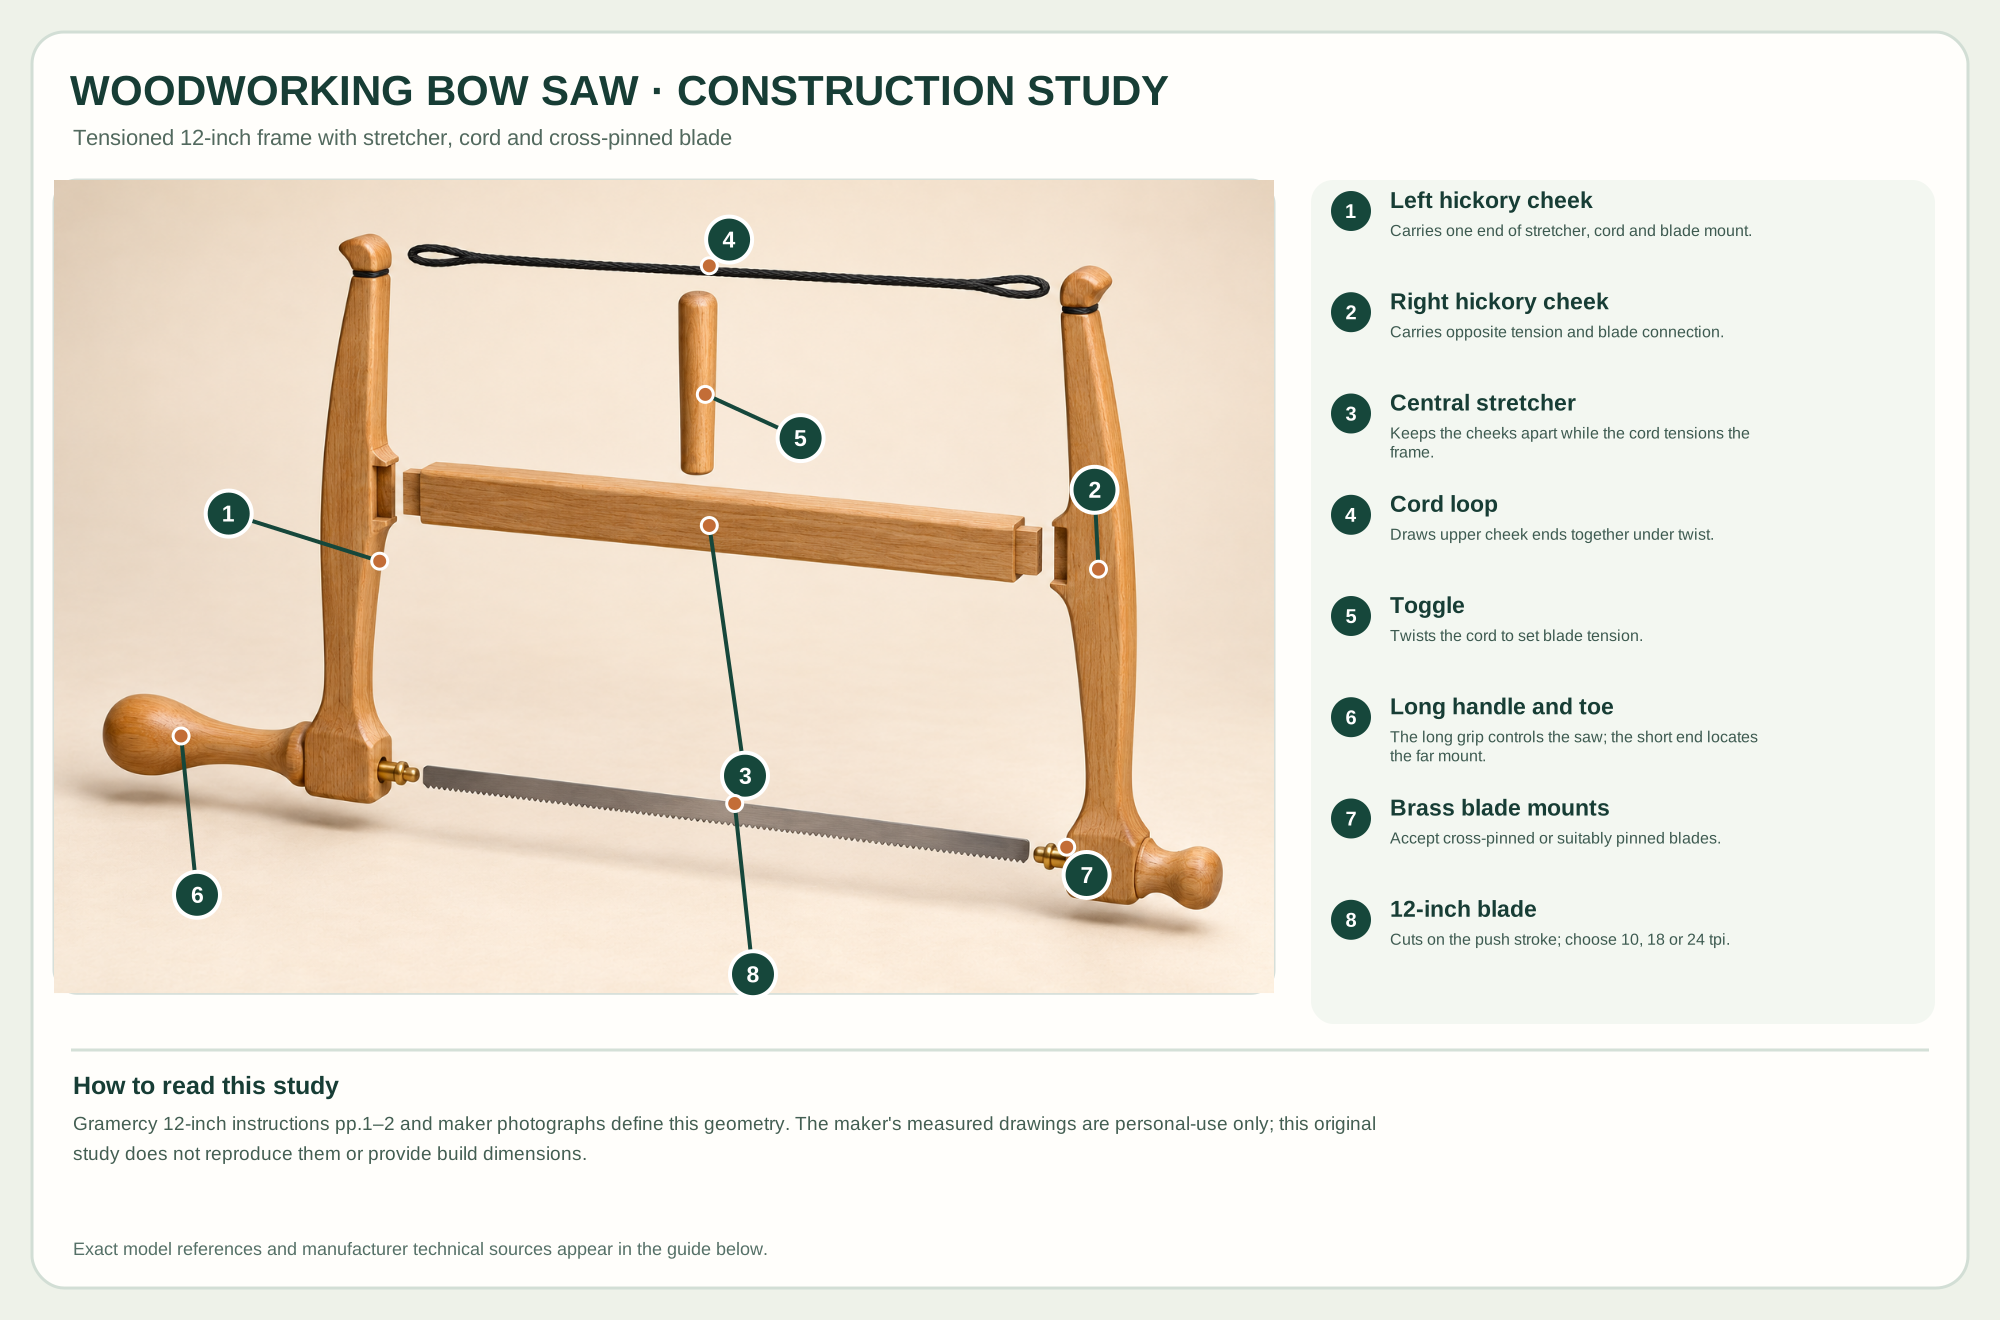
- Left hickory cheek
Carries one end of stretcher, cord and blade mount.
- Right hickory cheek
Carries opposite tension and blade connection.
- Central stretcher
Keeps the cheeks apart while the cord tensions the frame.
- Cord loop
Draws upper cheek ends together under twist.
- Toggle
Twists the cord to set blade tension.
- Long handle and toe
The long grip controls the saw; the short end locates the far mount.
- Brass blade mounts
Accept cross-pinned or suitably pinned blades.
- 12-inch blade
Cuts on the push stroke; choose 10, 18 or 24 tpi.
Technical references: Gramercy finished 12-inch bow saw · Gramercy official instructions. Two wooden cheeks meet a central stretcher under compression. A cord joins their upper ends and a toggle twists it to tension the blade between brass mounts near their lower ends. One end has the long rotating grip; the opposite end is the short toe. The included blades are cross-pinned and cut on the push stroke. Original educational artwork depicts documented component groups and their relationships; it is not a service sequence or a replacement for the exact model manual.
What it is and what each part does
Gramercy Tools' finished 12-inch bow saw is a tensioned wooden frame for controlled curves. Its two hickory cheeks carry a central stretcher, a cord loop at the upper ends and a turning toggle. A thin cross-pinned blade runs between brass mounts at the lower ends, with a long rotating handle at one end and short toe at the other. The finished saw includes 10, 18 and 24 tpi blades; the 18 tpi all-purpose blade comes installed in the maker's instructions. The original TWG study conveys the relationship of these parts without copying the maker's personal-use-only measured drawings.
Twisting the toggle shortens the top cord loop and draws the upper cheek ends together. The stretcher resists that compression and the lower ends pull a narrow blade taut. The brass mounts allow blade changes and handle rotation; the maker says the blade cuts on the push stroke. Tension only until the saw cuts smoothly. The wooden frame can crack if overtightened and is relieved by backing the toggle off after use.
Two hickory cheeks
The paired upright members transmit top-cord tension to the blade mounts at their lower ends.
Central stretcher
A straight wood crosspiece bears between the cheeks at mid-height; its ends seat in the frame.
Cord and toggle
The cord loop ties the upper cheek ends. The short toggle twists it, providing substantial leverage that can overtension the frame.
Handle, toe and brass mounts
The long handle guides the cut, while the short toe and opposite mount hold the blade's cross pins.
Three 12-inch blades
The maker supplies a coarse 10 tpi, installed all-purpose 18 tpi and fine 24 tpi blade; orient each to cut on the push stroke.
How the main groups connect
A cord and stretcher tension the blade
Set, guide and control the action
These decisions make the mechanism useful at the bench.
Fit the blade
Back off the toggle, unhook the cross-pinned blade, fit the chosen tooth count with teeth facing for a push cut, then inspect both mounts.
Set safe tension
Hold the saw away from people and twist the toggle slowly, trying a cut after each turn; stop when it cuts straight with modest give.
Guide the stroke
Grip the long handle with an extended forefinger for control and use full strokes through curves rather than twisting a short segment of the blade.
Tight curve
The narrow blade can follow a small radius when the operator uses full strokes and turns the handle rather than twisting the blade mid-cut.
Pierced opening
Release tension, pass the unhooked cross-pinned blade through a suitable opening, remount and tension before cutting.
Coarse or fine stock
Choose 10 tpi for rough or thick stock, 18 tpi general work and 24 tpi for thin stock and slower fine cuts.
Setup, technique and finish quality
Use the steps for a first pass, then inspect the work before changing the setup.
- Inspect both hickory cheeks, stretcher joints, cord and blade mounts for cracks or wear.
- Wear eye protection and secure the work at a comfortable height.
- Select 10, 18 or 24 tpi blade; release cord tension before unhooking or changing a blade.
- Fit the cross pins fully in both brass mounts with teeth oriented for the push stroke.
- Hold the frame away from yourself and others; slowly turn the toggle, testing the cut between turns.
- Use the long handle for a smooth full push stroke; avoid lateral twist and withdraw before forcing a bound blade.
- After work, back off the toggle one or two turns to rest the frame and store it dry.
Tension is limited by wood strength
The maker warns that toggle leverage can crack the cheeks before the cord seems fully tight; smooth cutting is the stopping criterion.
Blade twist is a technique issue
More cord tension does not prevent the thin blade from twisting on a curve. Full strokes and correct steering matter.
Handle rotation is normal
The instructions note that tension will not keep the handles from turning in the frame; check secure blade mounting, then guide deliberately.
What changes by model or material
Useful for thicker stock and rougher fast cuts.
Installed on the finished saw according to its instructions.
Useful on thin stock and controlled slow cuts.
Choosing the tool
- Check whether a 12-inch blade and frame depth suit the intended curves and stock thickness.
- Confirm replacement cross-pinned blades and brass mount compatibility.
- Prefer a larger frame or different saw when the work cannot be supported or the blade cannot reach.
Useful accessories
- Supplied 10, 18 and 24 tpi blades
- Stable bench or clamp for workholding
- Eye protection
Consumables
- Compatible replacement 12-inch blades
- Replacement cord only to maker specification
Care, troubleshooting and safety
Secure the work, protect sharp edges and release any stored clamping pressure before adjustment or maintenance.
Care checklist
- Release one or two toggle turns after use; never store at working tension.
- Wipe and dry the blade and brass mounts after cutting.
- Inspect hickory grain, stretcher mortises and cord before tensioning.
- Store the saw where the narrow blade will not be bent.
Common mistakes
- Overtightening because the frame still feels flexible.
- Installing the blade to cut on the pull stroke.
- Using short twisting strokes in a tight curve.
- Leaving the frame fully tensioned in storage.
Safety at the operation
- Wear eye protection; hold the frame away from yourself and others while tensioning.
- Stop immediately if a cheek cracks, a mount slips or the cord frays.
- Secure stock and keep fingers out of the blade path.
- Release tension before blade changes and after work.
When the result goes wrong
Inspect tooth direction, blade sharpness, mounts, reasonable tension and full-stroke technique.
Use full strokes and steer the handle; do not solve twist by overtensioning.
Stop and relieve toggle tension; inspect cheeks and stretcher before reuse.
Manuals and educational resources
Use the exact model documentation for setup, limits and replacement parts. These lessons, documents and model pages teach relevant techniques or help compare real variations.
Manufacturer documentation
Learn and compare
Manufacturers & Brands
These maker-owned links document relevant tools and tool brands. A product brand may use another company's factory; compare the exact model before choosing parts or accessories.
Choose parts for the exact model
Handles, irons, saw plates, clamping pads and other replacements vary by maker and model. Use the maker's documentation before changing a component.
Compare the Hand Saws family →Continue through the Tools library